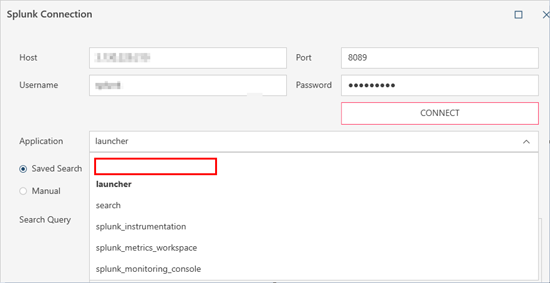
Connector Dialog for Splunk
Enter values into the dialog box to connect and fetch data from your Splunk data source.
Options
|
Field |
Description |
|
Host |
The name of the machine or domain containing the data source. This machine must be accessible from the machine where Monarch Data Prep Studio is installed. |
|
Port |
Port Number required to access the data source. |
|
Username |
A valid Username required to log-on to Splunk. |
|
Password |
A valid Password required to log-on to Splunk. This password must match the Username above. |
|
Connect |
Click this button to connect to the Host after specifying the connection information above. |
|
Application |
Select the Application for which you want to define a query. |
|
Saved Search |
Click on this radio button if a Search from a previous session is available. After selecting this button, select the search from the drop-down list. |
|
Manual |
Click on this button to execute a manual search operation. You will need to type in a valid Splunk search query into the Search Query box. |
|
Search Query |
Allows you to load, and then select, the tables from your database by entering a SQL Statement. Enter the complete SQL Statement to select the tables and columns. If you selected Tables and Views, this box is updated to show the corresponding SELECT * FROM TABLE query. |
|
Preview Data |
Click to fetch data using the credentials and criteria you have specified. 10 records are displayed to allow you to verify that you are selecting the correct data. |
|
OK/CANCEL |
Select OK to establish the connection and fetch data or Cancel to close the dialog. The state of the OK and PREVIEW buttons provide a handy status about the state of your connection:
|
Note:
When you select an Application, a blank name may sometimes display:

Select this blank name to display the saved searches for the default application, as defined in the Splunk User Profile.
© 2024 Altair Engineering Inc. All Rights Reserved.