Phase 3: Ply Stacking Sequence Optimization
This algorithm is aimed at providing a global view of what the optimal stacking sequence could be. An input deck for the ply stacking sequence optimization, oht_opti_ph2_shuffling.*.fem, was generated from a previous design stage.
Each ply bundle is divided into multiple PLYs whose thickness is equal to the manufacturable thickness (0.01 in this case), and the STACK card is updated accordingly. In this design phase, composite plies are shuffled to determine the optimal stacking sequence.
- The maximum successive number of plies of a particular orientation does not exceed 4 plies.
- The outermost four layers of the layup must be -45, 0, 45, 90.
Import the Model
-
Click .
An Import tab is added to your tab menu.
- For the File type, select OptiStruct.
-
Select the Files icon
 .
A Select OptiStruct file browser opens.
.
A Select OptiStruct file browser opens. - Select the oht_opti_ph2_shuffling.*.fem file you saved to your working directory.
- Click Open.
- Click Import, then click Close to close the Import tab.
Save the Database
- From the menu bar, click .
- In the Save As dialog, enter oht_opti_ph3.hm for the file name and save it to your working directory.
Update the Design Variables
- In the Optimization panel, click the composite shuffle panel.
- Click review.
- Select free-size to review the design variable.
- Select the parameters subpanel.
-
Click edit.
The DSHUFFLE card opens.
- Select MAXSUCC and in the MSUCC field, enter 4.
- Select COVER and in the NUMBER_OF_VANG field, enter 4.
-
In the DSHUFFLE card editor, edit the card.
- In the VREP field, enter 1.
- In the VANG(1) field, enter -45.
- In the VANG(2) field, enter 0.
- In the VANG(3) field, enter 45.
- In the VANG(4) field, enter 90.
This sets the outermost layer of the shuffling sequence to maintain one repetition of a set of -45, 0, 45, 90 degree plies. This ply set is applied to both faces of this optimization, since the laminate is symmetric. - Click return to exit the editor.
- Click update to update the design variable.
- Click return to return to the optimization page.
Run the Optimization
- From the Analysis page, click OptiStruct.
- Click save as.
-
In the Save As dialog, specify location to write the
OptiStruct model file and enter
oht_opti_ph3 for filename.
For OptiStruct input decks, .fem is the recommended extension.
-
Click Save.
The input file field displays the filename and location specified in the Save As dialog.
- Set the export options toggle to all.
- Set the run options toggle to optimization.
- Set the memory options toggle to memory default.
-
Click OptiStruct to run the optimization.
The following message appears in the window at the completion of the job:
OPTIMIZATION HAS CONVERGED.
FEASIBLE DESIGN (ALL CONSTRAINTS SATISFIED).
OptiStruct also reports error messages if any exist. The file oht_opti_ph3.out can be opened in a text editor to find details regarding any errors. This file is written to the same directory as the .fem file. - Click Close.
- oht_opti_ph3.prop
- OptiStruct property output file containing all updated property data from the last iteration for size optimization.
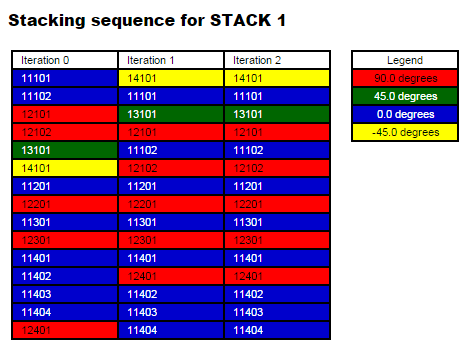
- oht_opti_ph3.shuf.html
- An HTML file contains the history of the shuffling optimization and the view of the ply stacking sequence.
Post-process Results
The plies are color coded based on their fiber orientations. The columns represent the global trend of the ply stacking sequence at a particular iteration, with the last column being the final solution.
The weight of the part has not been changed during the shuffling design phase, rather the plies were reordered to obtain the maximum performance.