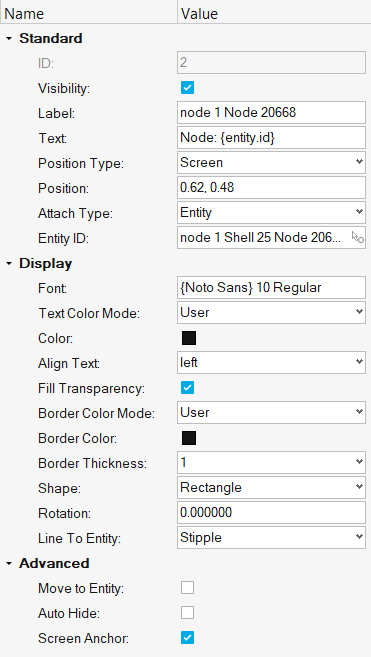
Notes can be edited by selecting a note in the Results Browser
then changing the attributes in the Entity Editor. Figure 1.
Standard
ID
The ID of the note.
Restriction: This field is not
editable.
Visibility
Activate/deactivate the check box to turn the display of the note on/off in
the modeling window.
Label
Click in the field to change the label of the note.
Text
Display the Note Text dialog. You can update the note text in the
Description box by entering text directly, or by selecting a field name
clicking Insert Field. You can also enter a Templex expression directly into
the Description box.
Position Type
Allows you to change the position of the note (Screen
or Coordinates).
Position
If Position Type is set to Screen, input values in terms of screen X and Y
position (pixels). If Position Type is Coordinates, input values in terms of
model X,Y,Z coordinates. Note that this is the position of the note text
box.
For Coordinates positioned notes:
Arrangement methods will not work.
Can be fit on the screen using the Fit Model or Fit All Frames
options.
Screen Anchor will be disabled.
Cannot be moved graphically.
Attach Type
Select the anchoring method for note using the drop-down menu:
Window (*Default)
Entity
Coordinates
Once attached, notes can be positioned anywhere in the window.
Entity ID
If the Attach Type is set to
Entity, then this field refers to the ID of the
entity to which the note is attached.
Display
Font
Display the Font Selector dialog, which allows you to select the font type,
font style, and font size.
Text Color Mode
User - select a color of your choice for the
note text. (*Default)
Maintain Contrast - select this option to
make sure that the note text color always maintains contrast with
respect to its fill color by using the text color black or
white.
Component - set the respective color for the
note text the same as the parent component color of the entity
attached to the note.
Contour - set the respective color for the
note text the same as the contour color assigned to the entity
attached to the note.
Color
Select a note color.
Align Text
Select the text alignment (within the note box) from the drop-down menu:
Left
Center
Right
Fill Transparency
Remove the color from the note box and make it transparent against the
window.
Fill Color Mode
User - select a color of your choice for the
note border. (*Default)
Component - set the respective color for the
note border the same as the parent component color of the entity
attached to the note.
Contour - set the respective color for the
note border the same as the contour color assigned to the entity
attached to the note.
Note: You must remove the check mark from the
Fill Transparency option in order to select
a fill color.
Fill Color
Select a fill color for the note box.
Note: You must
remove the check mark from the Fill Transparency
option and select the User option for
Fill Color Mode in order to select a fill
color.
Border Color Mode
User - select a color of your choice for the
note border. (*Default)
Component - set the respective color for the
note border the same as the parent component color of the entity
attached to the note.
Contour - set the respective color for the
note border the same as the contour color assigned to the entity
attached to the note.
Border Color
Select a border color.
Border Thickness
Select the border line thickness for the note box from the drop-down
menu:
0 (no border)
1
2
3
4
Shape
Select the outline shape of the note:
Rectangle
Circle
Ellipse
Note: This is option is only available only in the Entity Editor (it is not available in the Notes
panel).
Rotation
Specify the angle of rotation of the note box.
Line to Entity
Controls the style of the line connecting a note to the entity. If set to
Continuous, the portion of the line that is
hidden behind the model will be solid and if set to
Stipple, the portion of the line will
dashed.
Advanced
Move to Entity
Position the note at the attachment location.
Note: This option is disabled
if Window has been selected from the
Attach To drop-down menu.
Activating
the Move to entity check box will automatically
override the Anchor to Screen option (if
activated).
Auto Hide
Hide the note box when the entity that the note is attached to is not
visible on the screen.
Screen Anchor
Keep the note stationary during animation or when manipulating the model
view (rotating, zooming, and so on).
Note: This option is disabled if
Window has been selected from the
Attach To drop-down menu.