Set or Reset Note Creation Preferences
- through preference statements which are defined in the
preferences_post.mvw in the installation directory under
\hwdesktop\hw\prefinc.
OR
- through the Options menu in the Notes tool itself.
Note that the first method configures the settings at an application level, which means every instance of HyperView application will follow the settings specified in the file whereas in the second method, the settings are applied locally for a particular instance.
Also, some of the settings are configurable only via the Options menu.
Configure via Preference Statements
The following statements are available in preferences_post.mvw to configure Notes.
//Notes Panel
*NoteFont("Times New Roman",0,1,12) // Family, bold, italic, size (*NoteFont())
*NoteForeGroundColor("White") (*NoteForeGroundColor())
*NoteBackGroundColor("Blue") (*NoteBackGroundColor())
*NoteAttachment("Window") (*NoteAttachment())
*NoteDescription("Note 2") (*NoteDescription())
*NoteTransparency("On") (*NoteTransparency())
*NoteAnchorToScreen("Off") (*NoteAnchorToScreen())
*NoteTextAlignment("right") (*NoteTextAlignment())
*NoteBorderThickness("1") // or any +ve value. (*NoteBorderThickness())
*NoteShape("Rectangle") (*NoteShape())
*NoteFont("Arial",1,0,14).For more details about each of these statements, click on the links above to go to the respective help pages.
To learn about preference files in general, refer to the main topic: Preference Files.
Configure via the Options Menu
- From the Annotate tools, click the Notes tool.
Figure 1. 
- Open the Options menu by clicking
 on the
guide bar.
on the
guide bar.Figure 2. Note Preferences 
- Reset the settings by clicking the Refresh icon
 .
. - Set the fields to be added to every note by clicking
 for note
Text.
for note
Text. - Select the arrangement method for new notes.
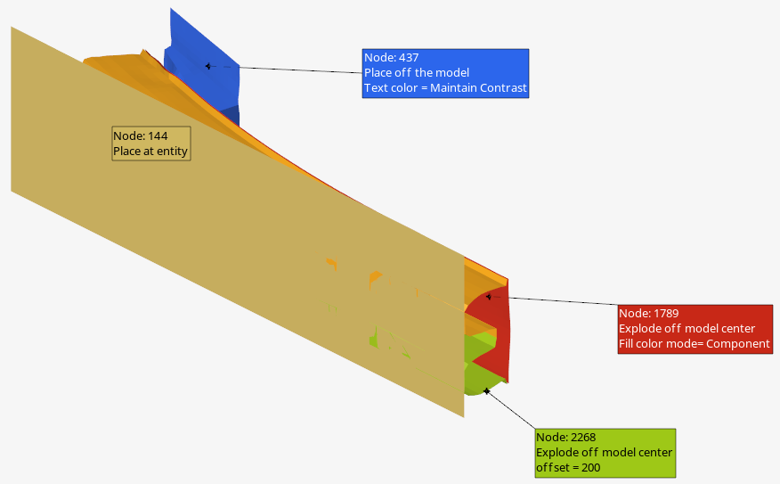
- Place at entity will create the new notes at the location of their attached entity. It can also be manually dragged.
- Place off the model will place the new note automatically outside the model in the modeling window, in the nearest location possible without overlapping the other notes.
- Explode off model center will place the new note automatically outside the model, in the direction from the center of the model to the location of the entity in a 2D projection plane.
- Explode with offset will place the new note in the direction from the center of the model to the location of the entity in a 2D projection plane, using the offset value specified under this field.
- Check the Screen Anchor option to anchor the note in the modeling window to stop it from moving during animation, zoom, pan, and rotation.
- Check the Auto-Hide option to hide the note even when the attached entity is hidden.
- Set note Colors upfront for new notes by choosing coloring
modes for the note Text, Border, and
Fill.
- Select the User color mode to set a color of your choice for the note Text, Border, or Fill. This is the default setting for note Text and Border.
- Select the Maintain Contrast note text color mode to make sure that the note text color always maintains contrast with respect to its fill color by using the text color black or white.
- Select the Component color mode for Text, Border, or Fill to set the respective color the same as the parent component color of the entity attached to the note.
- Select the Contour color mode for Text, Border, or Fill to set the respective color the same as the contour color assigned to the entity attached to the new note.
- Select the None color mode for Fill to maintain the note fill as transparent. This is the default setting for note Fill color.
- Create notes in the modeling window by selecting the
appropriate entity.
Figure 3. Note arrangement and coloring preferences