Collaboration Tools profiles are a collection of content types, parsers
and customizations using Collaboration Tools APIs and Tcl/tk scripting.
In this tutorial, you will learn how to create a Profile for managing Microsoft
Office documents within a Collaboration Tools library.
Content definitions encapsulate information about the types of data and information
managed by Collaboration Tools and viewable within the Organize browser. This information includes:
Metadata associated with the content
Dependencies between the metadata
Relationships that can be created between the content type and others
Any type of information or file can be managed by Collaboration Tools,
provided it can be described using the appropriate content definition format.
Content definitions are created using simple .xml files, conforming to the HyperWorks
XML Schema.
Note:Collaboration Tools does not have a schema validating
XML parser; hence, it is the responsibility of the publisher to make sure the
content type XML description is validated externally.
At the root of the document is the element ContentType, with name as a
mandatory attribute. It contains a list of metadata.
Each metadata has name and type as required attributes. There are many other
attributes, listed below, and best seen by example.
If the “mandatory” attribute is true, then this attribute must have a value
when the content is published to the library. In this case, it is good
practice to specify a “defaultvalue”.
Metadata may have a set of valid values.
Metadata attributes
name (mandatory - string): name of metadata.
type (mandatory - string): metadata value type. Should be one of string,
int, float, boolean.
dname (boolean): if it is true then the metadata is used as name for the
related content.
Note: dname can only be true for one metadata per content
definition.
editable (boolean): if it is true then the metadata is editable.
displayable (boolean): if it is true then the metadata is displayed.
mandatory (boolean): if it is true then the metadata is required to be
filled by you when creating content.
displayName (string): metadata display name.
defaultvalue (string): metadata default value.
category (string): metadata category.
A parser automatically extracts information from files when they are added to a
library. The extracted information is stored as content metadata, or as indexed
metadata, and can be used when searching for contents in the Organize browser. Searches can be metadata-based or full-text
based.
Update the librarypreferences.xml File
A typical profile consists of the following: Install.tcl: To
install the profile, libraryprofiles.xml: Contains path to
Content definitions, parsers and custom integration .tcl files, and Main folder: Contains custom
scripts, content definition .xml
files and parser .tcl files.
Copy this start package zip file (OfficeProfile_Raw.zip)
from the HyperWorks Enterprise
hwe.zip directory and extract it to a convenient
location, for example C: /OfficeProfiles/. The start package contains a generic
install .tcl file that does not need any editing. Now
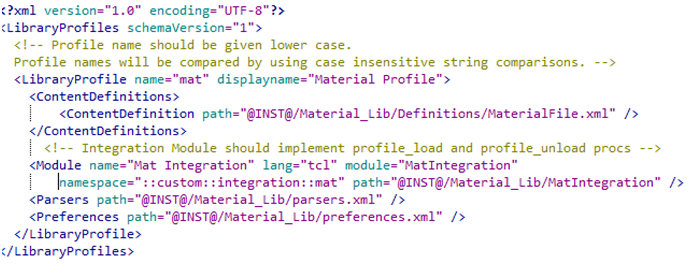
you will take a look at the libraryprofiles.xml file. The
image below shows a typical libraryprofile.xml file.
Figure 1.
To change the profile name edit the line, as shown below:
Figure 2.
Edit the path to content definition, as shown below:
Figure 3.
Edit the custom integration information, as shown below. This information will
be used by the core to point to appropriate Tcl
procedures which are used to perform custom operations in the Organize browser.
Figure 4.
Edit the path to the parser.xml file, which points to
parser Tcl files. You will look into
parser.xml in the following steps.
Figure 5.
Edit the path to the preferences file as shown below:
Figure 6.
Save your updated librarypreferences.xml file.
Create Content Definition for Office Documents
Now you will create content definition for office documents. The folder
\Profile_Main\ContentDefinitions contains all the content definition files of a
profile. Since you are creating only one content definition for this profile the
start package has only one content .xml file. A profile can have multiple content definitions.
Rename the .xml file under
Profile_Main\ContentDefintitions to
OfficeDocument.xml.
Open the OfficeDocument.xml file in a text editor, change
the file types and save. This informs the core that this content type has three
types of files, Word, Excel and PowerPoint.
Figure 7.
Now take a look at the parser.xml which points to parser
code in Tcl. Open the \Profiles_Main\parser.xml in
a text editor and edit the information, as shown below. The module informs the
core which Tcl package to use and the namespace is
to inform the core which Tcl namespace to use to
parse the data.
Figure 8.
Parser Tcl Code
In the previous step you edited the parser.xml file to point to
the appropriate Tcl code. Now you will take a look at
the parser Tcl code. For simplicity the start package
code does not need any editing.
Open \Profiles_Main\OfficeParser1.0\OfficeFileParser.tcl
in a text editor.
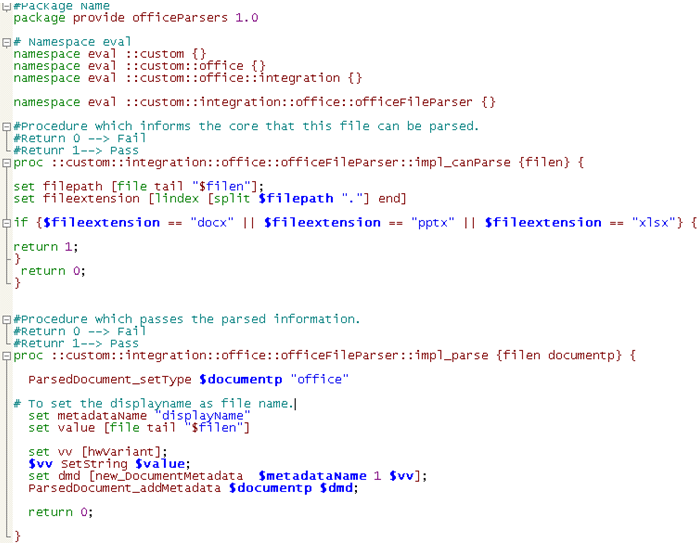
Procedure ::custom::integration::office::officeFileParser::impl_canParse
informs the core whether a file can be parsed. You can add your own logic to
decide if the file can be parsed.
Note: A return value of 0 informs the core that
the file cannot be parsed. Under such a situation the file will be added as
a general file in the library. A return value of 1 informs the core that
this file can be parsed. In the code below you will check for the file
extensions and if they are .docx,
.pptx or .xlsx then set the
return as 1. Otherwise it will return 0. Procedure
::custom::integration::office::officeFileParser::impl_Parse parses the
information and sets the parsed information as metadata on the content being
added to the library. In the code below the display name is set as the file
name by using the API ParsedDocument_addMetadata. For more information,
refer to the Collaboration Tools API documentation.Figure 9.
Customize the Organize Browser
Now you will work on the customization of the Organize browser.
Via profiles you can add your own custom context menus,
toolbar icons and also have custom procedures which will be run before or after a
lifecycle operation. For example, if you want to display a message saying "Check in
successful" after a content is checked in you could add this message as part of the
post check-in call. Refer to the Collaboration Tools Profiles
documentation for more details.
In this exercise you will edit an existing context menu
procedure to show a message when it is clicked from the Organize browser.
Open the file
Profiles_Main\OfficeIntegration1.0\officeIntegration.tcl
in a text editor.
Search for procedure ::custom::integration::office::CtxMenuAddCustomItems. The
core will look at this procedure to add the custom context menus.
Add command -command "::custom::integration::office::ShowMessage $obj as shown
below:
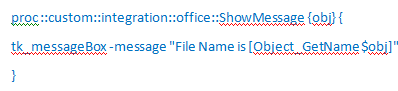
Figure 10. Note that you are calling another procedure
::custom::integration::office::ShowMessage as an action after the custom
context menu is clicked. Copy the code below in the
officeIntegration.tcl file. It does not matter where
the lines below are pasted in the .tcl file.Figure 11.
Install a Profile
To install a profile run
C:\OfficeProfile\install.tcl.
Once the installation is complete, an Installation Complete message
displays in the Tcl command window.
Restart the session after the Profile installation is
complete.
Create a New Library Using the Office Profile
From the Organize browser select the Repository type
Personal.
Select the combo box from the Library and select New
Library.
A New Library dialog opens.
Enter the Name and select the path where you want to create the library.
Click the Profile field to see the list installed and
select Office Profile. Leave the Workspace as the
default.
Click OK to create a new
library.
Add a New Content to the Office Library
In the previous step you created a new library using the Office profile. Now you will
add a PowerPoint document to this library.
Select OfficeDocument from the New Content
toolbar.
A New Office Document dialog opens.
Click in the Value area of the Documents row, click the File
Browser and browse to and select an Office file.
Click Open. The File Name is automatically
populated.
From the File Type row select the appropriate file type.
As an enhancement to the previously created parser, you could update the
parser to set this value automatically.
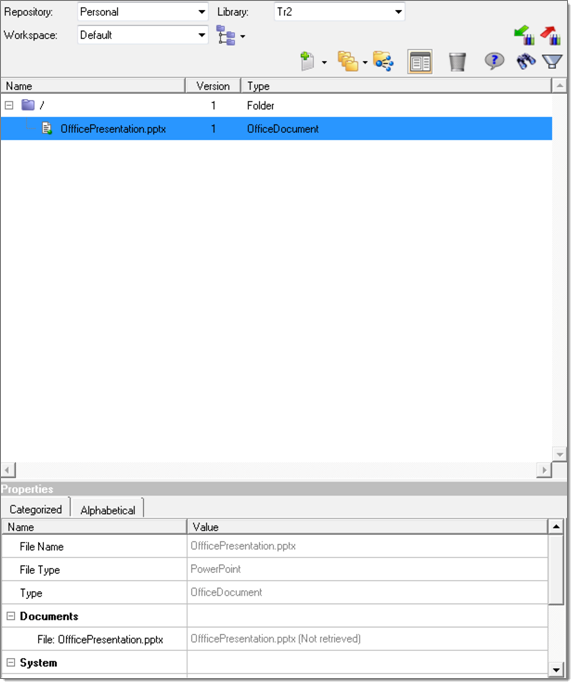
Click Save to add the PowerPoint file to the
library.
Figure 12.
View the Custom Context Menu
Now you will review the action of adding a new custom context menu.
Select the PowerPointFile content you added to the library earlier.
Right-click the above selection to view the context menus.
The custom menu appears on the top of a list of available context menus.
Select the custom context menu to display the
filename.
Click OK to return to the
Organize browser.
Summary
In this tutorial you created a new profile, added a new content definition, added a
new parser, and customized the context menu to display the file
name.
Collaboration Tools profiles can be used to do so much more. Refer to
the Collaboration Tools Profiles and API documentation for more
information.