OS-T:2070 DMIGを用いた縮退モデル
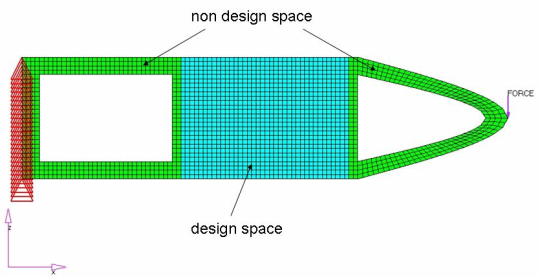
本チュートリアルでは、シンプルな片持ち梁をモデル化した既存の有限要素モデルを使用し、静的縮退を使って有限要素モデルを縮退する方法について説明します。また、その縮退モデルについてトポロジー最適化を実行します。
- 目標
- コンプライアンスの最小化
- 制約条件
- 体積を現状の40%以下に
- 設計変数
- 設計空間内の各要素の密度
静的縮退によるモデル縮退テクニックで縮退すべきモデルのパートは、スーパーエレメントと呼ばれます。OptiStructでは、スーパーエレメントの境界自由度、すなわち、マトリックスの直接入力により置き換えられる縮退部コンポーネントと縮退されない部分との接合箇所の自由度のセットを示すには、ASETまたはASET1バルクデータエントリが必要です。ASETの数が多いほど、静的縮退の精度と解析コストは高くなります。例えば、静的縮退を用いることにより、解くべきマトリックスのサイズは小さくなりますが、縮退マトリックス(DMIG)が非常に密である場合、マトリックスが疎であるフルモデルの場合と比べて解析時間が長くかかります。したがって、DMIGを用いた効率的な解析を行うには、ASETエントリの選択が非常に重要となります。
HyperMeshの起動とOptiStructユーザープロファイルの設定
-
HyperMeshを起動します。
User Profilesダイアログが現れます。
-
OptiStructを選択し、OKをクリックします。
これで、ユーザープロファイルが読み込まれます。ユーザープロファイルには、適切なテンプレート、マクロメニュー、インポートリーダーが含まれており、OptiStructモデルの生成に関連したもののみにHyperMeshの機能を絞っています。
モデルのオープン
- をクリックします。
- 自身の作業ディレクトリに保存したcantilever_full.hmファイルを選択します。
-
Openをクリックします。
cantilever_full.hmデータベースが現在のHyperMeshセッションに読み込まれます。
スーパーエレメントの作成
ASETs荷重コレクターの作成
-
荷重コレクターを作成します。
-
拘束条件を作成します。
-
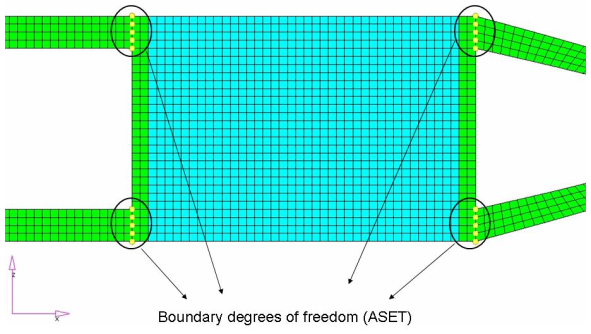
節点セレクターを使って、境界節点を選択します。
図 4.
-
節点セレクターを使って、境界節点を選択します。
- returnをクリックし、メインメニューに進みます。
後続の最適化で縮退されたない要素の削除
- キーボードのF2キーを押し、Delete panelに進みます。
- エンティティセレクターをelemsにセットし、をクリックします。
-
図 5に示す要素の周りにウィンドウを描きます。
図 5. 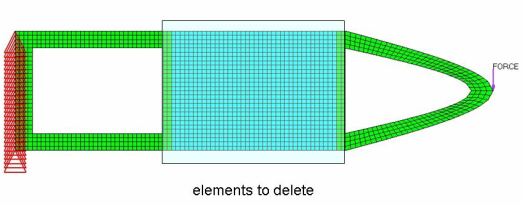
- delete entityをクリックします。
- returnをクリックし、メインメニューに進みます。
縮退マトリックスを外部ファイルに書き出すためのパラメータの定義
- Analysisページからパネルcontrol cardsパネルをクリックします。
- Card Imageダイアログで、PARAMをクリックします。
- EXTOUTを選択します。
- card imageの上部、EXTOUTの下で、DMIGPCHを選択します。
- returnをクリックし、PARAMから抜けます。
- returnをクリックし、メインメニューに戻ります。
データベースの保存
- menu barでをクリックします。
- Save Asダイアログでファイル名欄にcantilever_dmig.hmと入力し、自身の作業ディレクトリに保存します。
ジョブのサブミット
-
AnalysisページからOptiStructパネルをクリックします。
図 6. OptiStructパネルへのアクセス 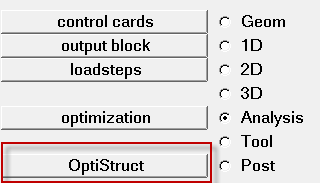
- save asをクリックします。
-
Save Asダイアログで、OptiStructモデルファイルを書き出す場所を指定し、ファイル名としてcantilever_dmigと入力します。
OptiStruct入力ファイルには、拡張子 .femが推奨されます。
-
Saveをクリックします。
入力ファイル欄には、Save Asダイアログで指定されたファイル名と場所が表示されます。
- export optionsのトグルをallにセットします。
- run optionsのトグルをanalysisにセットします。
- memory optionsのトグルはmemory defaultにセットします。
- OptiStructをクリックし、OptiStructジョブを開始します。
- cantilever_dmig.out
- ファイルの設定、最適化問題の設定、実行に必要なRAMおよびディスクスペースの推定量、各最適化反復計算の情報、解析時間等、特定の情報を含むOptiStructの出力ファイル。ワーニングおよびエラーに関しては、このファイルを確認すること。
- cantilever_dmig.stat
- 解析のプロセスの間のそれぞれのステップでのCPU情報を提供する、解析のプロセスの要約。
- cantilever_dmig_AX.pch
- 縮退マトリックス(DMIG)ファイル
マトリックスは、DMIGバルクデータエントリと同じフォーマットで.pchファイルに書き出されます。これらは、1つのヘッダーエントリと1つまたは複数のカラムエントリで定義されます。デフォルトでは、剛性マトリックスの名称はKAAX、質量はMAAX、荷重はPAXです。本チュートリアルでは質量マトリックスは使用されないため、.pchファイルには書き出されません。
I/O OptionのエントリのDMIGNAMEにより、マトリックスの名称をコントロールすることが可能です。
データベースの作成
スーパーエレメントをモデルに含める
モデルのオープン
- をクリックします。
- 自身の作業ディレクトリに保存したcantilever_full.hmファイルを選択します。
-
Openをクリックします。
cantilever_full.hmデータベースが現在のHyperMeshセッションに読み込まれます。
DMIGを使って縮退されたスーパーエレメントパートの削除
- キーボードのF2キーを押し、Delete panelに進みます。
- エンティティセレクターをelemsにセットし、をクリックします。
-
図 7に示す要素の周りにウィンドウを描きます。
図 7. 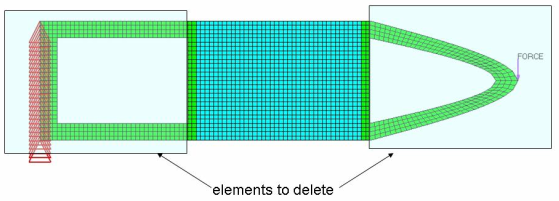
- delete entityをクリックします。
- returnをクリックし、メインメニューに進みます。
DMIGを伴うトポロジー最適化のセットアップ
- Analysisページからパネルcontrol cardsパネルをクリックします。
-
INCLUDE_BULKコントロールカードを定義します。
-
K2GGコントロールカードを定義します。
-
P2Gコントロールカードを定義します。
- P2Gをクリックします。
- P2G=欄に、PAXと入力します。
- returnをクリックし、P2Gコントロールカードを終了します。
- returnをクリックし、メインメニューに進みます。
最適化のセットアップ
Create Topology Design Variables
- From the Analysis page, click optimization.
- Click topology.
- Select the create subpanel.
- In the desvar= field, enter topo.
- Set type: to PSHELL.
- Using the props selector, select design.
- Click create.
-
Update the design variable's parameters.
- Select the parameters subpanel.
- Toggle minmemb off to mindim=, then enter 1.2.
- Click update.
- Click return.
Create Optimization Responses
- From the Analysis page, click optimization.
- Click Responses.
-
Create the volume fraction response.
- In the responses= field, enter Volfrac.
- Below response type, select volumefrac.
- Set regional selection to total and no regionid.
- Click create.
-
Create the compliance response.
- In the response= field, enter Compl.
- Below response type, select compliance.
- Set regional selection to total and no regionid.
- Click create.
- Click return to go back to the Optimization panel.
Create Design Constraints
- Click the dconstraints panel.
- In the constraint= field, enter VFrac.
- Click response = and select Volfrac.
- Check the box next to upper bound, then enter 0.4.
- Click create.
- Click return to go back to the Optimization panel.
Define the Objective Function
- Click the objective panel.
- Verify that min is selected.
- Click response= and select Compl.
- Using the loadsteps selector, select step.
- Click create.
- Click return twice to exit the Optimization panel.
データベースの保存
- menu barでをクリックします。
- Save Asダイアログでファイル名欄にcantilever_opti.hmと入力し、自身の作業ディレクトリに保存します。
Run the Optimization
- From the Analysis page, click OptiStruct.
- Click save as.
-
In the Save As dialog, specify location to write the
OptiStruct model file and enter
cantilever_opti for filename.
For OptiStruct input decks, .fem is the recommended extension.
-
Click Save.
The input file field displays the filename and location specified in the Save As dialog.
- Set the export options toggle to all.
- Set the run options toggle to optimization.
- Set the memory options toggle to memory default.
-
Click OptiStruct to run the optimization.
The following message appears in the window at the completion of the job:
OPTIMIZATION HAS CONVERGED.
FEASIBLE DESIGN (ALL CONSTRAINTS SATISFIED).
OptiStruct also reports error messages if any exist. The file cantilever_opti.out can be opened in a text editor to find details regarding any errors. This file is written to the same directory as the .fem file. - Click Close.
- cantilever_opti.hgdata
- HyperGraph file containing data for the objective function, percent constraint violations, and constraint for each iteration.
- cantilever_opti.HM.comp.tcl
- HyperMesh command file used to organize elements into components based on their density result values. This file is only used with OptiStruct topology optimization runs.
- cantilever_opti.HM.ent.tcl
- HyperMesh command file used to organize elements into entity sets based on their density result values. This file is only used with OptiStruct topology optimization runs.
- cantilever_opti.html
- HTML report of the optimization, giving a summary of the problem formulation and the results from the final iteration.
- cantilever_opti.oss
- OSSmooth file with a default density threshold of 0.3. You may edit the parameters in the file to obtain the desired results.
- cantilever_opti.out
- OptiStruct output file containing specific information on the file setup, the setup of the optimization problem, estimates for the amount of RAM and disk space required for the run, information for all optimization iterations, and compute time information. Review this file for warnings and errors that are flagged from processing the cantilever_opti.fem file.
- cantilever_opti.res
- HyperMesh binary results file.
- cantilever_opti.sh
- Shape file for the final iteration. It contains the material density, void size parameters and void orientation angle for each element in the analysis. This file may be used to restart a run.
- cantilever_opti.stat
- Contains information about the CPU time used for the complete run and also the break-up of the CPU time for reading the input deck, assembly, analysis, convergence, and so on.
- cantilever_opti_des.h3d
- HyperView binary results file that contain optimization results.
- cantilever_opti_s#.h3d
- HyperView binary results file that contains from linear static analysis, and so on.
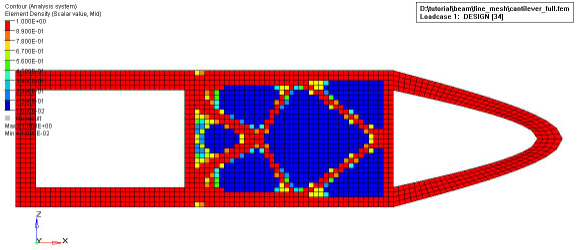
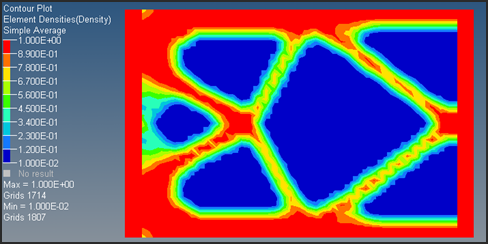
結果の表示
要素密度の結果はすべての反復計算について、OptiStructからcantilever_opti_des.h3dファイルに出力されます。また、変位および応力の結果は、デフォルトで最初と最後の反復計算の各サブケースについて、cantilever_opti_s#.h3dファイルに出力されます(#はサブケースID)。
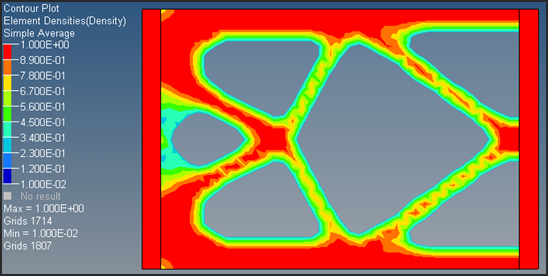
密度結果のコンタープロットの表示
- OptiStructパネルから、HyperViewをクリックします。
-
Resultsツールバーで
 をクリックし、Contour panelを開きます。
- Result typeをElement Densities[s]およびDensityに設定します。
- Averaging MethodをSimpleに設定します。
- Applyをクリックし、密度のコンターを表示します。
-
Animationツールバーで
 をクリックし、Simulationリストから最終反復計算を選択します。
要素密度のアイソバリュープロットの表示
-
Resultsツールバーで
 をクリックし、Iso Valueパネルを開きます。
- Result typeをElement Densitiesに設定します。
- Show valuesをAboveにセットします。
- Applyをクリックします。
- Clipped geometryの下で、FeaturesとTransparentを選択します。
-
密度しきい値を変更します。
- Current value欄に0.3と入力します。
- Current valueの下のスライダーを動かします。
密度のしきい値を更新すると、modeling windowに表示されているアイソバリューもインタラクティブに更新します。このツールを使用して、OptiStructからの材料レイアウトおよび荷重のパスを見易くしてください。